What Is Your Partner Worth on a Near-Sweep Bid Euchre Hand?
I play Pigs and Hogs Bid Euchre with a friend who has become famous at our table for a particular kind of bid. He'll pick up a monster hand, push the bidding to seven in a game where eight is the maximum normal bid, and stop there instead of moving to one of the higher-paying alone bids.
He's not doing this with a lay-down loner. If there's no reasonable way for his hand to lose a trick, he'll go alone like everyone else. The interesting hands are the ones that look like seven or eight tricks but still have one or two cards that could lose.
Sometimes keeping his partner works perfectly. His partner covers exactly the weak card he needs covered and the team takes all eight. Other times he takes every trick almost by himself, and the rest of us spend the rest of the night debating whether he left points on the table.
That gets at a more useful question than whether bidding seven is too conservative:
What is your partner actually worth when you have a near-sweep hand with one or two possible losers?
The answer depends on the hand, the auction, the score, and especially your local Bid Euchre rules. But the basic decision is whether your partner meaningfully improves your chances of covering those weak cards—or whether you're giving up a much higher-paying bid just to feel a little safer.
First, Know Which Version of Bid Euchre You're Playing
There isn't one standardized set of Bid Euchre rules. Decks, hand sizes, scoring systems, auction formats, and special alone contracts vary considerably from one region to another. If you need a refresher, check out the How to Play Bid Euchre or How to Play Euchre guides for important rules and game play.
Some games progress through normal numerical bids and then offer one or more all-trick contracts. The amount of help available from a partner can also vary considerably. Some versions allow one partner card, some allow multiple cards, and others distinguish between an assisted solo contract and a completely unaided one.
The auction itself varies too. Some games bid only the number of tricks and select trump afterward. Others include the proposed suit, high no-trump, or low no-trump in the bid. That difference matters for this strategy because your partner's earlier bid may have already told you something useful about the cards you're hoping to receive. Bid Euchre even has documented house rules where certain auction calls are explicitly used to communicate information about a player's hand.
For the examples below, we'll use a 4 person game with an eight-trick double-deck style game and a representative bidding ladder:
7 → 8 → alone with help → completely alone
The exact scoring and terminology at your table may be different. The strategy is the point.
Near-Sweep Hands Are Where the Decision Gets Interesting
A hand with every trick locked up isn't much of a strategy problem. Take the higher-paying alone bid.
The difficult hands have one or two potential losers.
In double-deck Bid Euchre, that can be particularly interesting because holding one ace doesn't necessarily make the king behind it good. The second copy of the ace may still be out there. Depending on how the cards fall, that king could become a winner—or the opponent holding the other ace could save it and stop your sweep.
Those are the hands where your partner has value.
But that value isn't simply "my partner has eight cards." You want to know whether those eight cards are likely to help with the specific weaknesses in your hand.
Example 1: Two Possible Losers — Keep the Partner
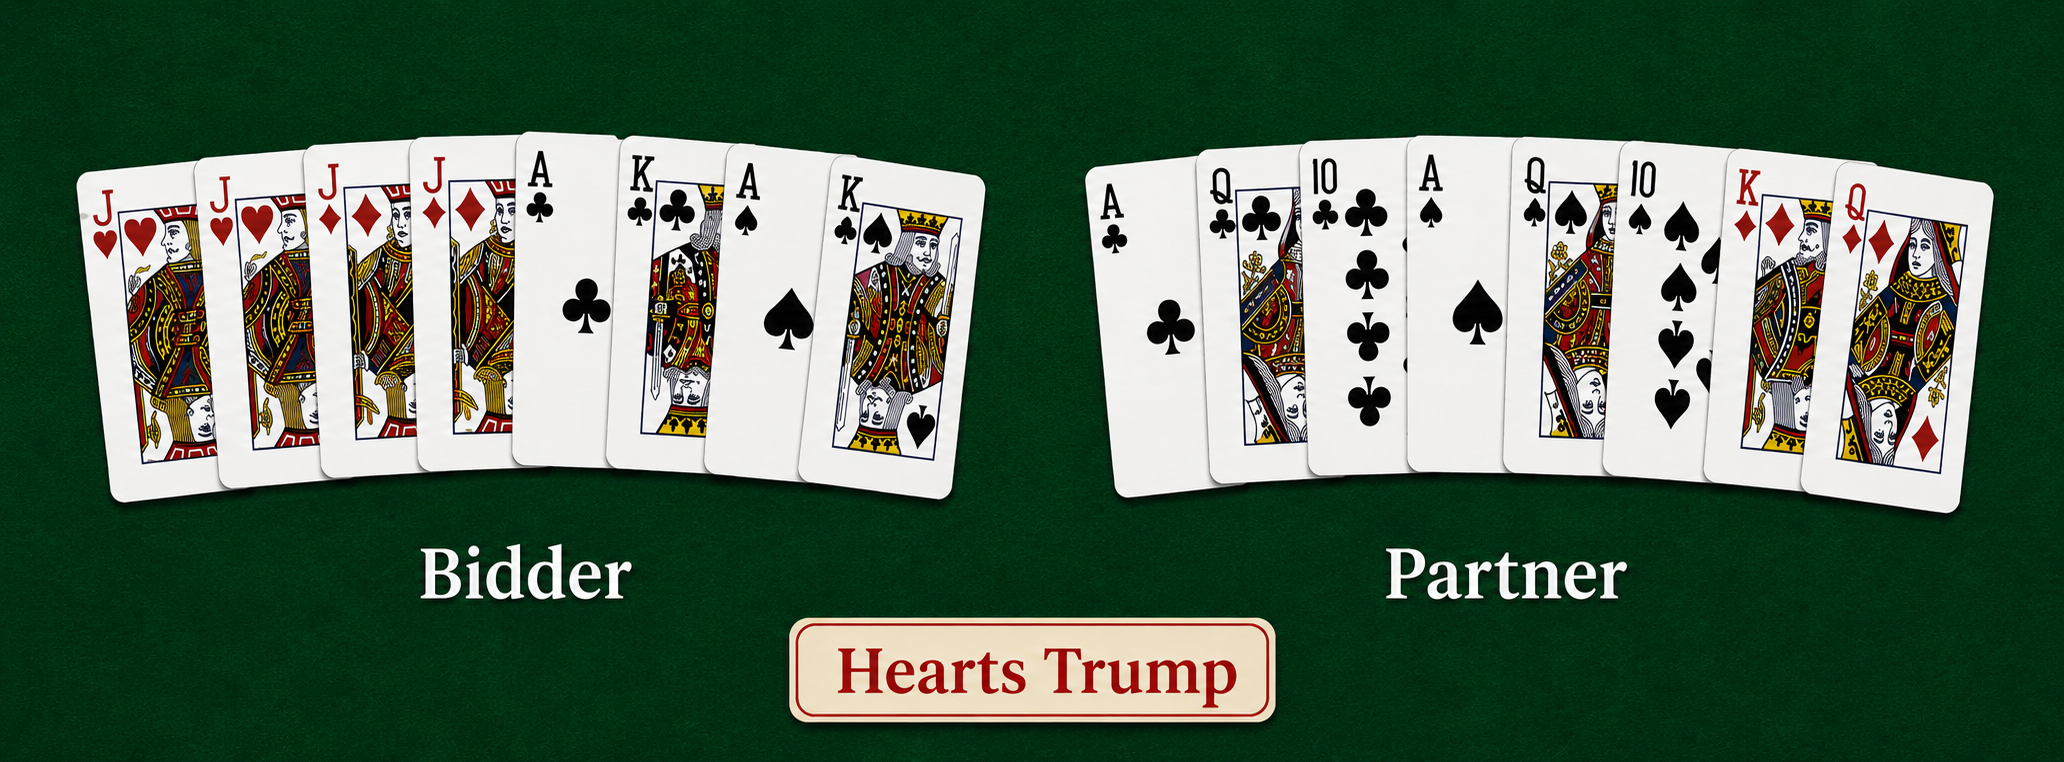
With two possible losers, keeping your partner can provide protection in more than one suit. Here, the partner holds the missing aces in both clubs and spades.
Assume hearts are trump in a double-deck game.
The bidder has both right bowers and both left bowers. Trump control isn't the problem.
The uncertainty is in clubs and spades.
The bidder has A♣-K♣ and A♠-K♠, but because this is double-deck, the other A♣ and A♠ are still somewhere. If an opponent can save one of those second aces, either king could become the trick that stops the sweep.
The partner changes the hand dramatically. The partner actually holds both missing aces and also has lower cards in those suits. If the bidder leads A♣, for example, the partner doesn't necessarily have to waste the second A♣ immediately; the lower club may allow that ace to remain available to protect the K♣ later. The same possibility exists in spades.
This is exactly the type of hand where a high partnership bid can make sense.
The bidder has two identifiable weaknesses, and the partner can realistically protect both of them.
Going alone removes that protection. Taking only one partner card may fix one suit while leaving the other exposed. Keeping the partner gives the team multiple chances to preserve the sweep.
The Auction Can Tell You What Your Partner Is Worth
Of course, you don't get to look at your partner's hand before deciding what to bid.
That's where the auction becomes important.
In versions where a bid includes the suit or contract type, your partner may have already given you useful information. A partner who earlier bid clubs has told you something very different from one who bid low no-trump. A high no-trump bid suggests a different kind of hand again.
You shouldn't interpret those bids more precisely than your rules and partnership conventions justify. A bid of five clubs doesn't automatically mean, "I have the exact A♣ you need." But it can shift the odds enough to matter when you're deciding whether to ask that partner for a card.
This becomes especially important when your hand has one obvious hole.
Example 2: One Possible Loser — Alone With Help
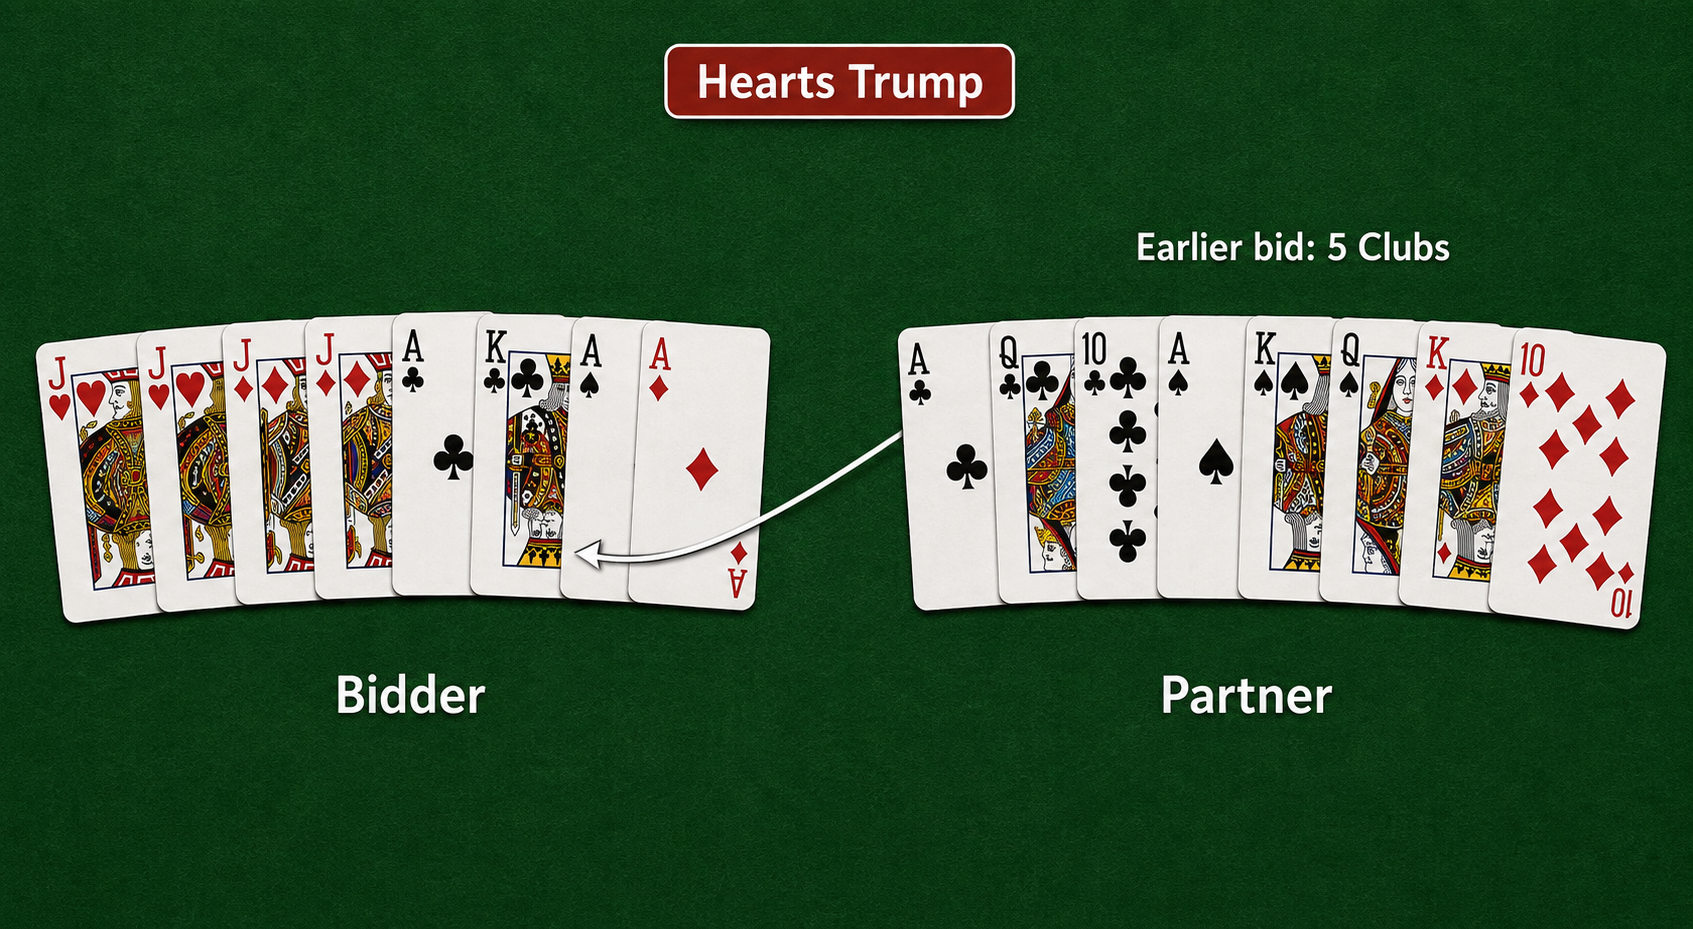
The bidder has only one real concern: the K♣. An earlier club bid from the partner is a clue that the card needed to fix that weakness may be available on an assisted-alone bid.
Again, hearts are trump.
Bidder: J♥, J♥, J♦, J♦, A♣, K♣, A♠, A♦
There isn't much wrong with this hand. The bidder controls the four top trump and has three strong side-suit aces.
The K♣ is the question mark.
The bidder holds one A♣, but the second A♣ is still out there. If an opponent owns it and manages top reserve it, the K♣ can lose.
Now add one piece of information from the auction:
Earlier, your partner bid 5 clubs.
That doesn't prove the partner holds the second A♣, but it tells you that clubs were strong enough for the partner to enter the auction. If your assisted-alone rules allow your partner to choose a card to give you, that earlier club bid is meaningful information. Your chances of receiving something that improves the club holding are better than they would be if your partner had passed or had bid an unrelated contract.
Suppose the partner actually holds:
Partner: A♣, Q♣, 10♣, A♠, K♠, Q♠, K♦, 10♦
Now the one-card assist is extremely valuable. Take the A♣, discard the vulnerable K♣, and the original one-loser hand becomes dramatically stronger before the bidder plays alone.
That's the sweet spot for an assisted alone bid:
You don't need your partner to play eight tricks. You need your partner to fix one specific problem.
The auction can help you judge whether that fix is reasonably likely to be available.
A Suit Bid Isn't the Only Useful Signal
The same idea applies when your rules allow high no-trump or low no-trump to be named during the auction.
Suppose the card you're hoping to improve is a high side-suit card. A partner who made a competitive high no-trump bid has given you at least some reason to believe high-card strength exists across the table.
A partner whose hand was strong enough to bid low no-trump has communicated something different. In the common low no-trump structure documented in several Bid Euchre variants, low cards become the controls rather than aces. That information may be extremely valuable for one type of assisted hand and almost useless for another.
The key point is to use information that's already available to you. Experienced players already do this throughout the auction. If your partner has told you something about suit strength, high-card strength, or low-card strength, don't suddenly ignore that information when deciding between eight, alone with help, and completely alone.
When the Signal Should Push You Toward the Assisted Bid
Imagine two otherwise identical hands with one questionable card. In the first auction, your partner passed without revealing anything useful. In the second, your partner made a strong bid in exactly the suit where your hand is vulnerable.
The cards in your own hand haven't changed, but the assisted-alone decision has. That's an important distinction because you aren't evaluating the partner card blindly anymore. You have partial information.
That doesn't guarantee you'll get the perfect card. But it can turn:
"Maybe my partner can help me."
into:
"My partner has already shown strength in the one place I need help."
That's a much better reason to take the assisted contract.
Example 3: One Possible Loser — Take the Completely Alone Bid
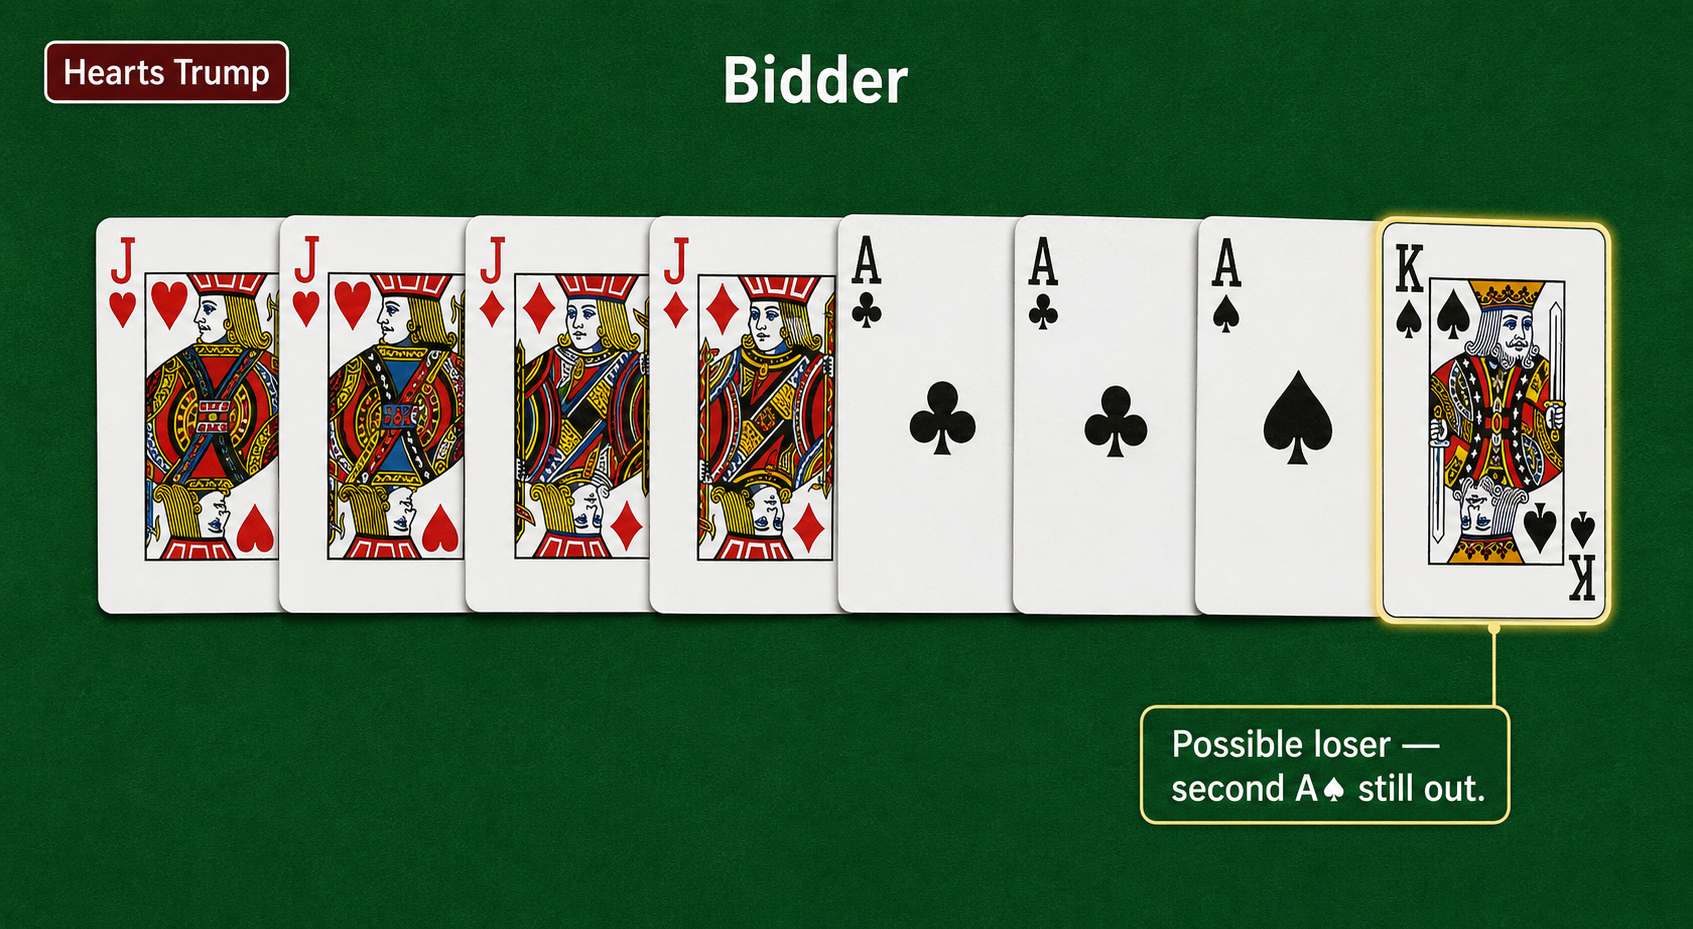
This isn't a lay-down loner—the K♠ can still lose to the second A♠. The decision is whether that risk is small enough to justify the larger payoff for going completely alone.
Now consider a stronger version of the hand.
Bidder: J♥, J♥, J♦, J♦, A♣, A♣, A♠, K♠
This still isn't a lay-down loner.
The bidder has both copies of the A♣, so clubs are completely controlled. But the K♠ isn't certain. The second A♠ is somewhere else, and if an opponent can keep it for the K♠, the sweep is over.
There is a real loser. That's what makes the decision worth discussing.
If your partner had earlier shown strong spades, I'd be much more interested in an assisted-alone bid. The auction would be giving me a reason to believe the missing A♠ might be available.
But suppose the partner has given you no useful spade signal. Now the extra safety of the assisted bid becomes less certain. Depending on your scoring system, the completely alone contract may be worthtaking the risk.
You aren't saying the K♠ can't lose. You're deciding that the higher reward justifies accepting the possibility that it does.
That's fundamentally different from a lay-down loner. The hand is not guaranteed. It's a calculated gamble.
The Real Question: What Are Your Losers, and Who Can Fix Them?
Before stopping at seven or eight, identify the cards that can actually beat you.
Not vaguely:
"Something might go wrong."
Specifically:
"My K♣ loses if the other A♣ is against me and survives the first club trick."
Or:
"I have two side suits where the second ace can stop the sweep."
Once you identify the problem, the value of your partner becomes much easier to evaluate.
If you have two vulnerabilities and need your partner active in both suits, the maximum partnership bid may be right.
If you have one vulnerability and your partner's auction suggests the exact kind of card that could fix it, alone with help becomes much more attractive.
If you have one relatively narrow vulnerability, little useful information from your partner, and a major scoring premium for going completely alone, accepting the risk may be the better play.
That's a much more useful framework than simply counting trump.
Assisted Alone Is Really an Information Bet
It's tempting to think of alone-with-help as merely a safer loner.
For experienced players, I think that's incomplete.
It's really a bet on how valuable the partner card is likely to be.
That value depends on three things:
How specific your weakness is. One bad card is much easier to repair than two unrelated problems.
How the exchange works. A partner-selected best card is very different from a blind exchange.
What the auction has already told you.
The stronger the information and the more targeted the exchange, the more attractive assisted alone becomes.
Score Still Matters
Even with the same cards and the same auction, the scoreboard can change the decision.
If eight with your partner gives you exactly what you need to win, there may be little reason to take a substantially riskier contract for points you don't need. If you're behind and need a big swing, the opposite is true. A hand with one genuine loser may still be worth taking completely alone if the payoff is large enough.
This is also one area where you can't copy another group's strategy blindly. Some Bid Euchre games score actual tricks, others score only the contract, and special sweep contracts can have very different rewards and penalties. The same hand can rationally produce different bids under different scoring systems.
My Rule of Thumb
With these near-sweep hands, I'd ask:
Exactly which one or two cards can lose?
Does keeping my partner help with both problems or just make me feel safer?
Did my partner communicate anything during the auction that points toward the card I need?
Would one partner card solve the problem, or do I need the partner active throughout thehand?
How much additional reward am I getting for accepting the next level of risk?
What does the score require right now?
The decision isn't just about the eight cards in your hand. It's about your hand plus everything you've learned before the bidding ends.
That's what makes my friend's famous seven-bids interesting. He isn't passing up lay-down loners. He's deciding that one or two possible losers are enough reason to keep his partner around.
Sometimes he's right.
But if the auction has already told him that the card he needs is probably sitting across the table—and he can take that card with him on an assisted-alone bid—I'm going to have a much harder time defending the seven.
And I'm probably going to tell him that before the next hand is dealt.
Playing four-player Euchre or four- or six-player Bid Euchre?
What’s Trump? keeps track of the score, dealer and trump so you can focus on the game. View What’s Trump? on the App Store